Multifunction Steering Wheel Retrofit
- Model & Year: 91-97 8-Series
- Expertise: Intermediate
- Date: May 12, 2011
- Updated: April 27, 2020
- Time Estimate: 2-3 days
Tools Required
- Wiring supplies
- Other basic hand tools
Facilities Needed
- Garage (dry, secure work area)
Parts Required
- (1) BMW Multifunction Wheel w/Airbag (options below), $250-$450 used
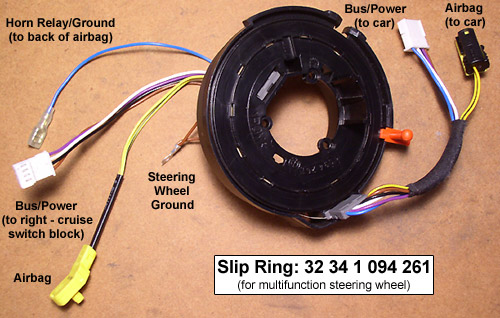
- (1) Slip Ring, p/n 32-34-1-094-261, $175 list
- Pre-'95 + all CSi: (1) Column Switch Bracket, p/n 32-31-1-162-088, $3.79 list
- (1) BMW Wiring Connector, p/n 61-13-6-913-635, $2.98 list
- (5) BMW Wiring Leads/Pins, p/n 61-13-0-005-198, $1.82 list each
 |
 |
 |
| Standard 4-Spoke E38/39; 9/96 thru 3/99 Wheel: 32-34-1-094-259 Airbag: 32-34-1-097-125 |
M 3-Spoke E38/39; 9/97 thru 3/99 Wheel: 32-34-2-228-671 Airbag: 32-34-2-229-130 |
Sport 3-Spoke |
- (1) BMW CD43 Radio (about $300 used):
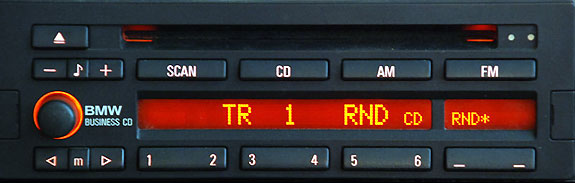
NOTE: BMW cassette radios such as the C33 and C43 do not respond to MF wheel buttons.
Optional:
Phone:
- Parrot CK3000 "Evolution" Bluetooth System ($120) with Connects2 CTPPAR007 Wiring Kit ($80), or
- Factory TCU or ULF
Cruise:
- for 840Ci only:
- (1) E38/39 Cruise Control Module, p/n 65-71-8-375-497, $651.79 list
- (1) E38/39 Cruise Control Actuator, p/n 65-71-8-369-027, $320.12 list
Getting Started
Update your 8-series with something that should've been standard from '95-on: a multifunction wheel. The information compiled here is applicable to all airbag-equipped BMW's built since 7/90 (earlier models may have used different airbags and steering columns). Credit is due to E36 BimmerForum members vlacki and bluebook, E38 BimmerBoard members David Cecil, Qsilver7, and 04sshd; and especially 8er.org founder Martin Brügger - all of whom performed pioneering work from which I have drawn.
Wheels
There are two smaller diameter, single-stage airbag multifunction wheels used in '97-'99 E38/39's (with slip ring '261) optimally suited for adaptation. (See below for more on the Sport 3-spoke. Wheels from '95-'96 [with slip ring '912] require a separate control module and are therefore less suitable.) This retrofit is easier for most BMW's from '95-on which use updated column switch brackets and airbag connectors, however earlier models are easily adaptable.
Sport 3-Spoke: This popular wheel is made for the column-mounted slip rings on the E46 and therefore is not directly compatible. However, machining the wheel's base and other changes will allow use of the '261 slip ring.
- BMW Sport 3-Spoke Supplement - PDF document by Frankie
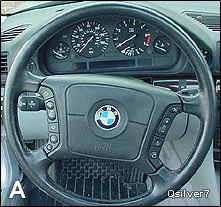
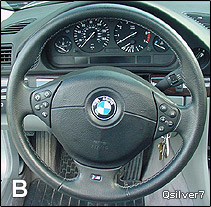
Note these two wheels offer customizable button block options. For instance, telephone buttons are optional, while wheel A may include either wheel heater or HVAC recirculation button (unusable with 8-series). Wheel B has no heat option but offers button covers. (Wheel C has no options.) Therefore, for example, wheel B could be configured with radio buttons only. For button block details, see RealOEM wheel A, wheel B(1), wheel B(2), and wheel B(3).
Heated Steering Wheel: To use the wheel A heater, you must use slip ring '262 with contact switch and matching wheel/airbag. See heated wheel for details.
Radio
Functionality is achieved by using the CD43, an i-bus capable, factory CD radio. Extend the white i-bus output wire from the '261 slip ring to terminal 7 of the radio wiring harness. For those using aftermarket radios, check with the radio's manufacturer for adaptors.
For those wishing to use only radio buttons with wheel B, install a right button cover after removing the cruise button face. The wheel's radio button wiring still needs to connect thru the unused cruise button block, however.
For those using factory CD changers, they will need to be replaced with newer i-bus CD/MP3 changers and data cables. See procedure section below.
Phone
Integrating a hands-free "bluetooth" phone system allows more complete utilization of your MF wheel while providing real practicality. One approach uses the Parrot CK3000 bluetooth kit along with the Connects2 steering wheel adaptor. Another option is to install a factory Bluetooth TCU or ULF module. See procedure section below.
Cruise
While adapting radio functions is simple, cruise functions are more involved. There are two possible approaches: 1) install an electronic adaptor which mimics cruise stalk output using wheel button input, or 2) swap cruise control components for those that understand the wheel buttons.
While use of an electronic adaptor would be ideal (and was once sold by Swiss electronics whiz and 8-series enthusiast Martin Brügger), unfortunately such a device is no longer available.
Without an electronic adaptor, swapping cruise components is your only option. But this works only for V8 engines in the 840Ci. (All V12 models utilize circuitry integrated with the engine control unit.) Incidentally, 6-cylinder BMW's may also use this approach.
Compatibility is achieved by swapping in E38/39 cruise components, specifically the cruise module (GRII) and its related actuator with cable. Re-pinning the connector is required. See diagram below:
BMW used three different variations of cruise functions on the E38/39 with the most desirable being from 9/97-on. Therefore cruise modules should be sourced from 740/540's built from 9/97. New cruise modules require coding from the dealer, which is why used modules from V8 powered cars are needed. (6-cylinder cars may pull from the 528.) Unlike the cruise module, cruise actuators do not require coding and are the same from 9/96-on.
A wiring diagram including part numbers is available in the Procedure section below.
Procedure
Wheel
Follow my previously written Steering Wheel Retrofit using slip ring '261, and note the following:
- Fully lower and extend the motorized steering column before disconnecting battery!
- Leave the bus/power car connector of the new slip ring in place. Alter the slip ring's car airbag connector only if your car originally used the '901 slip ring (thru '93), as specified in the above procedure.
- Use wire connector set specified below to receive the bus/power connector from new slip ring:
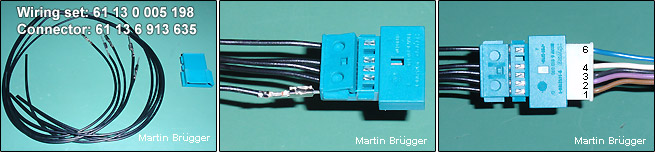
- Pin 1 (brown) - Ground: to ground location under column.
- Pin 2 (purple) - Power: from 12v source (ex: cruise switch, radio).
- Pin 3 (black) - Cruise Bus Signal: to retrofitted GRII cruise module.
- Pin 4 (white) - Radio Bus Signal: to terminal 7 of radio wiring harness. See Radio below.
- Pin 6 (blue) - Horn: to horn relay (existing brown/red wire under column).
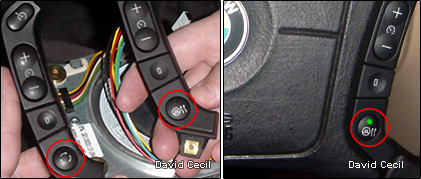
- Tap fused power sources which are hot in accessory/run/start. For 840's, the cruise switch wire from connector pin 1 (violet/white) is ideal (see image below left). 850's may use radio pin 5 or others. Tap-in squeeze connectors are convenient.
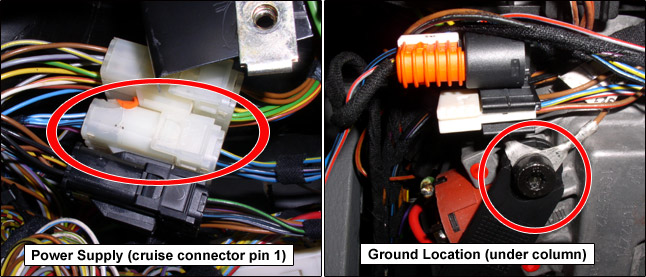
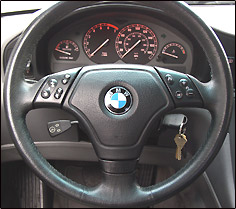
- For a ground terminal, use an under-column location (see image above right). '95-on cars are pre-wired from original '111 slip ring. Simply open the car's connector and transfer the pin 1 brown wire into pin 1 of your new connector.
- The light control module (LKM) has no input and therefore wheel buttons are lit at all times.
Radio
- Extend slip ring's pin 4 (white wire) to radio wiring harness terminal 7. See image below. Run the radio bus wire down the right side of column along the ignition switch interlock cable, to radio. Secure wire with tie wraps.
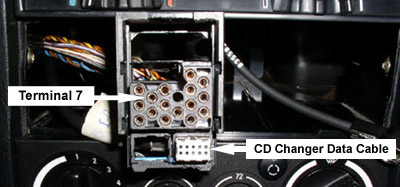
- To use a CD/MP3 changer, see Factory-Look Audio Upgrades. Use tap-in squeeze connector to create a Y branch for changer's i-bus line.
- Again, source proper wiring supplies. For example, use terminal 61-13-0-007-449 in the radio harness.
Phone
See: Bluetooth Integration or Factory Bluetooth Retrofit.
Cruise
Cruise Component Swap
Source all parts and review wiring diagram referenced below. Cruise actuators require the matching cable and electrical connector. Mounting hardware may be needed too. If possible, open and re-pin connectors as needed instead of cutting & splicing.
Note the diagram is labeled "untested". But it is based on the successful work accomplished in the E36 Bimmerforums. After installation, note that cruise system diagnostics (fault readouts) will no longer be available, or limited at best. Sourcing cruise parts from either a salvage yard or eBay will be the most cost effective.
E38/39 Cruise Control Retrofit for E31 (840Ci) - by Frankie.
Note: This method is untested in the 8-series, but has been successfully performed in the E36 3-series. The GRII cruise module offers even smoother operation than earlier factory systems, along with a cluster annunciator light. I have no additional installation details and the wiring diagram is only theoretical. However, this should provide a foundation for those proceeding down this path - Frankie.