Factory-Look Audio Upgrades
- Model & Year: 92-95 3-Series, U.S.
- Expertise: Beginner
- Date: December 21, 2004
- Updated: May 11, 2019
- Time Estimate: varies
Tools Required (varies)
- Metric allen wrenches
- Tie wraps
- Bentley or Haynes service manual (optional)
- Heat-shrink tubing and misc. wiring accessories
- Other basic hand tools
Facilities Needed
- Work bench
- Level, dry surface
Parts Required
- BMW factory radio C33/C43/CD43, $150 - $350 (used)
- BMW CD changer data cable, p/n 65-12-8-369-830, $38 list
- BMW i-bus power plug, p/n 61-13-8-377-072, $12 list
Getting Started
Do you wish your "old" factory audio system could do the things that newer BMW's can do? Want to add an MP3 changer or Bluetooth adapter? Would you like to get rid of that dated cassette player? Easy! Just upgrade your audio system to BMW's newer "i-bus" system.
Converting your stock, m-bus audio system (thru 1995) to BMW's newer i-bus standard (1996-on) allows you to install updated factory radios (with their tasteful stock appearance) as well as install a host of new electronic devices with features typically available only on newer models. For example, by upgrading to a '96-on radio you'll be able to use mp3 CD changers, USB and Bluetooth interfaces, and auxilliary input adaptors (for use with devices such as iPods, etc).
The conversion process is surprisingly simple. It requires swapping the older CD changer data cable (which runs from radio to trunk) and its associated power plug (in trunk) with an updated cable and plug, along with running a new wire from the power plug to the radio. For those who wish to use only a radio head unit, the new radios are plug-n-play, and may be used without swapping the CD changer data cable or power plug.
I have organized this DIY into two sections with associated instructions:
- Radio
- Data Cable (for use with CD/MP3 changers, Bluetooth devices, aux-in adaptors, etc)
Although written specifically for 3-series cars, this procedure is generally applicable to many "older" BMW's.
Electronics removal and replacement procedures are in the Bentley or Haynes service manual, therefore I will only add additional procedures as necessary. REMINDER: when working with factoty radios, be sure to have the BMW security code!
Procedure
Radio
Replacing just the radio is an easy upgrade. A good source for used radios is eBay. Another great source for radios and accessories is German Audio Tech.
'96-on, i-bus radios are direct plug-in replacements and bring new features such as speed-sensitive volume, three banks of six FM presets, and in-dash CD. There are three models of interest:
 |
 |
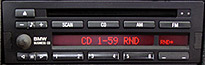 |
| C33 standard '96-on i-bus radio (about $150 used) |
C43 deletes weather band, adds PTY/RDS (about $200 used) |
CD43 deletes tape, adds CD (no mp3) (about $350 used) |
While none of these radios operate "old" pre-'96 CD changers, they can be made to operate newer changers or iPod/USB interfaces by upgrading the data cable and power plug. See Data Cable next. Be aware the CD43 is the only radio that responds to steering wheel controls when coupled with a multi-function steering wheel.
Popular and affordable iPod/USB/Bluetooth adaptors are sold by Grom. Other auxiliary input adaptors can be found at BlitzSafe. Note these devices work only with the updated data cables and radios metioned here.
Data Cable
Replacing the old CD changer's data cable (which runs from radio to trunk) with the newer version (p/n 65-12-8-369-830) and matching i-bus power plug (p/n 61-13-8-377-072), will allow you to add a matching i-bus CD/MP3 changer and control it from the radio. It's also used to connect with any iPod, USB, Bluetooth, or aux-in interface. See images below.
This change requires one of the three radios specified above. With new cable and power plug installed, '96-on factory changers (and iPod/USB/Bluetooth interfaces) will be plug-n-play, such as the current factory MP3 changer (as sold by BimmerNav).
 |
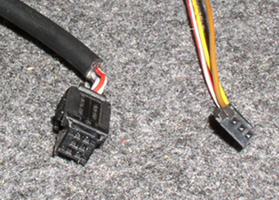 |
| 92-95 data cable (left) with power plug (right) | 96-on data cable (left) with power plug (right) |
The original yellow power plug is shown above. The new power plug (above, far right) may be purchased from a dealer or taken from a salvaged car. The new plug has three wires: 1) red - power, 2) brown - ground, 3) yellow - i-bus. Splice: new red > old red, new brown > old black. Then, the yellow i-bus wire must be routed to terminal 7 in the radio wiring connector:
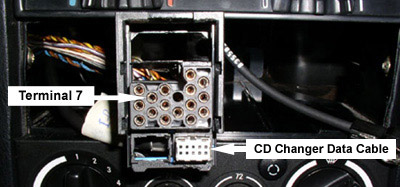
To obtain the proper wire terminals for your connector, use p/n 61-13-1-376-206. After running the diagnostic wire from the trunk, push the terminal into your radio connector with a small screwdriver. These terminals have tiny one-way barbs and cannot be easily removed once pressed into position.
Data Cable Installation
- Remove radio.
- Release old data cable from radio wiring harness by removing blue retaining clip. See image below left. Install new data cable into harness.
- Remove OBC and parcel shelf, then remove shift knob and shift cover.
- Remove center ashtray/cup holder, then rear ashtray and surrounding trim.
- Remove rear bench seat, left side bolster, and left rear speaker. See image right, below.
- Gather new data cable and i-bus wire and check length.
- Proceed to run both behind the OBC/parcel shelf, around the left side of the shifter, and underneath the center console/cup holder. Use tie wraps.
- Push wires thru center console arm rest, then under carpet to left side passenger footwell.
- Now route wiring thru rubber grommet to trunk. See image below right.


Running the data cable down the left side and under the driver's side door sill is an option too, but I've found those plastic parts break easily, making it difficult to put back in place securely.
Now all that's left is to buy and connect the electronics you desire. Do this by shopping as if you had a 1996-on 3-series!
Enjoy!