Bluetooth Integration
- Model & Year: 91-97 8-Series
- Expertise: Intermediate
- Date: February 2012
- Updated: February 2017
- Time Estimate: 6-8 hours
Tools Required
- Basic hand tools
Facilities Needed
- Work Bench
Parts Required
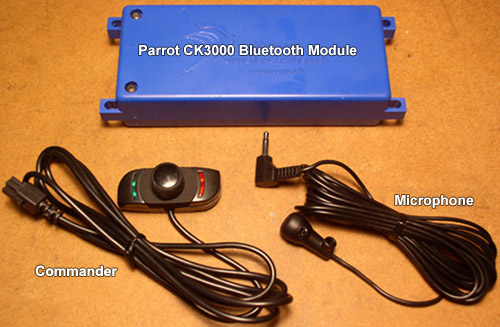
- Parrot CK3000 "Evolution" Bluetooth System, price: $120 + shipping
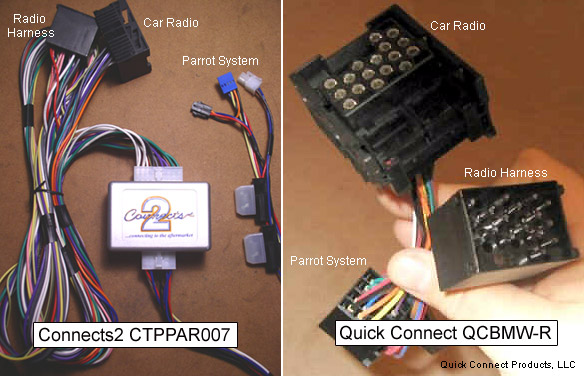
- For multifunction steering wheels: Connects2 CTPPAR007 Wiring Kit, price: $80 + shipping
- For standard steering wheels: Quick Connect QCBMW-R Wiring Harness, price: $55 + shipping
Getting Started
Integrating a hands-free "bluetooth" phone is a great way to modernize your 8-series while adding practical functionality. The information given here is based upon prior work done in the E46 Fanatics forum by sycE46 and delmarco.
NOTE: the systems discussed here require the use of newer I-bus radios. Since the 8-series' standard radios were M-bus, see Factory-Look Audio Upgrades to make this needed but simple swap.
Approach
My goal is to achieve factory-like integration utilizing as much existing equipment as possible. This means connecting to a factory radio (which mutes playback automatically when calling), employing the existing telephone speakers built into the front speaker enclosures, and using the built-in mic location.
Surveying the possibilities, there are several stand-alone bluetooth kits (visor mount type) which, while effective, do not meet my criteria. Aftermarket BT-capable radios are available but compromise tasteful factory aesthetics.
Factory Bluetooth Systems
Retrofitting a factory Bluetooth-capable Telephone Control Unit (TCU) is a popular option in many late-90's era BMWs. While I have not attempted this in an 8-series, it may work (after installation of i-bus radio):
- Factory Bluetooth Retrofit (written for E38 7-series)
More affordably, the MediaBridge ($300) and versatile Grom (about $200 w/bluetooth dongle) are impressive but limited, since they interface only thru the radio's CD changer connection. This means your radio must be on and in CD mode in order to use BT features.
Selection
Therefore I have selected the affordable Parrot CK3000 "Evolution" system along with plug-n-play radio wiring adaptors (see required parts above) to achieve my goal of factory-like integration -- all for around $200. The CD changer connection remains open for use with a CD/MP3 changer or aux-in for iPod, etc.
However, this installation is optimized for voice only. If you require bluetooth audio streaming from a smart phone, I suggest the Grom system. (Be aware that data compression used for audio streaming results in a perceptible - though slight - loss of audio quality.)
Parrot Utilization
The highest level of factory integration with the Parrot kit is achieved by coupling it with a multifunction steering wheel, which allows control of your phone from the steering wheel buttons. You may utilize standard steering wheels as well but this will require control of the system from the Parrot commander (although some voice commands may be used by enabling Parrot "Magic Words"). Simply mount the commander in a discreet area.
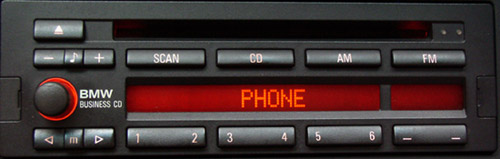
As noted above, use of I-bus factory radios such as the C43 or CD43 is required.
Parrot Operation
So what do you get? In short:
- Phone audio thru car speakers, mutes radio when in use ("PHONE" displayed on radio),
- Utilize factory mic location for OEM look,
- Answer/end call/redial with commander/voice (or from multifunction wheel buttons),
- Adjust volume thru radio (or from multifunction wheel buttons),
- Pair up to three (3) phones.
While Parrot supports hands-free voice dialing, it's unreliable. Therefore, keep your phone handy to select phone numbers and place calls.
Features not supported with this approach versus full factory integration are: display features (caller ID and phone book scrolling), phone charging, and signal reception (must rely on phone unaided by external car antenna).
This system works with radio on or off, and in any radio playback mode (AM/FM/CD/Tape). The Parrot module outputs its own power and therefore can drive speakers independently (for pairing and in-coming call notifications). However to support phone conversation, the radio must be "on".
Do not confuse Parrot voice commands with voice dialing. Parrot allows spoken "Magic Word" commands ("answer call", "redial", "end call", etc) while voice dialing interfaces with your phone book to place calls. In my experience, voice dialing is ineffective, but voice commands work better.
Too Cool: A multifunction wheel in your 8-series with the Parrot/Connects2 system!
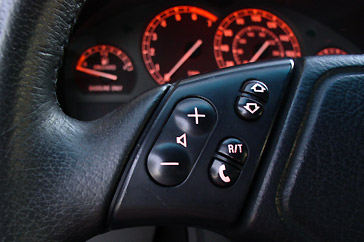
- Answer Call - press telephone button,
- End Call - press R/T button,
- Discrete Mode - press telephone button during call to switch to handset, press again to return to car,
- Redail - press and hold telephone button for 2 seconds,
- Adjust Volume - use volume buttons.
- VIDEO: Multifunction Steering Wheel Retrofit - Phone
Source the Parrot system from either eBay or Amazon. Radio harness adaptors (and full kits including the Parrot system) are sold by U.S. vendor Quick Connect. For multifunction wheels, the "Connects2" steering wheel adaptor is sold by British vendor Dynamic Sounds (also on eBay).
NOTE:
- Actual operation of the Parrot system is not covered here. Visit the Parrot website to preview the owner's manual, read FAQ's and support forums, etc.
- Some eBay vendors sell Parrot kits labeled as "new" when they're actually reconditioned (open box). You get what you pay for!
- I believe Connects2 can be used for both multifunction AND standard wheels.
Procedure
The following procedure illustrates a Parrot/Connects2 bluetooth installation in an 8-series using a CD43 radio and retrofitted multifunction steering wheel. Standard wheel installations are identical (except where noted).
With Connects2, the wiring harnesses (2) that come with the Parrot kit are not needed. Connects2 provides all necessary wiring including power supply. (Quick Connect uses the supplied Parrot wiring.)
The Parrot commander must remain attached for proper system function but, for MF wheels, is not needed for daily use. The commander is used initially for system set-up, phone pairing, and voice tagging. It may then be hidden away. (The Parrot commander is needed for use with standard wheels.)
The good component mounting location is behind the glove box. This also allows easy wiring access. And, the glove box is a great place to hide the commander (for MF wheels). For standard wheels, mount the commander in an accessible but discreet location of your choice.
Microphone Preparation
Microphone placement can be a matter of personal preference. Since I strongly prefer a factory appearance, I chose the previously useless in-dash factory mic enclosure. TIP: Use a factory blank enclosure (65 61 2 255 695) and save your stock mic.
1) Remove radio and OBC. Then, unplug and remove microphone.
2) Open enclosure and remove factory mic inside. See image below, panel A. De-solder (or cut) mic from the rear clip.
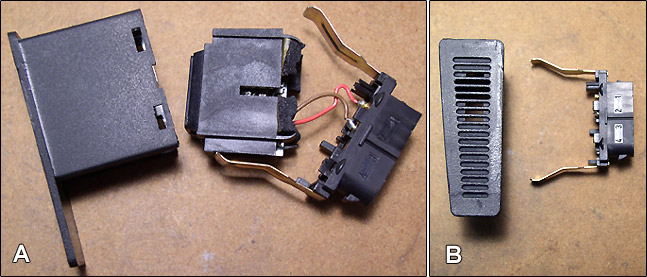
3) Using a Dremel or other suitable tool, remove and reduce the protrusions on inside of rear clip, to make room for new Parrot mic. Optional: using an X-Acto knife, remove the plastic from the 2nd-4th grille openings in order to provide a wider sound opening for the new, round mic. See image above, panel B.
4) Using appropriate riser/spacer blocks and supplied mic foot, fit the mic inside factory enclosure and secure with double-sided tape. See image below, panel A:
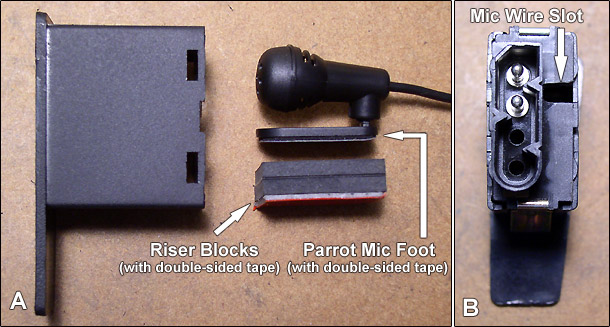
5) Using Dremel or other tool, cut a slot in the upper right of rear clip for mic wire. See image above, panel B.
6) Install rear clip and verify overall fit. You're done! Mic direction can be adjusted from the front (thru the grille) using a small pointer tool after installation is complete.
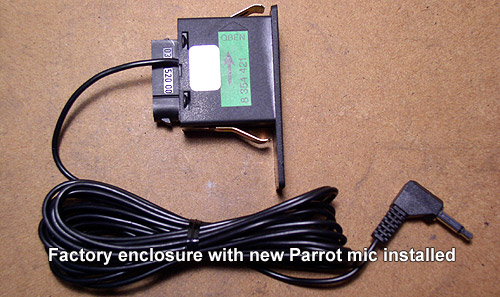
TIP: Splice a common wiring connector into mic wire (behind mic) to allow for enclosure detachment, in case the center console needs to be removed in the future.
Parrot/Connects2 Installation
Connects2 and QuickConnect send non-amplified phone audio and amplified system signals ("chirp" pairing notifications and incoming call "rings") thru the radio's left front speaker wire. Both are amplified before being routed to the speaker. This results in harsh system signals ("chirps" and "rings") when radio is "on". Resolve this by jumpering chirp output directly to the unused voice speaker. NOTE: This approach disables voice dialing capability (marginally useful anyway).
1) Prep Connects2 harness for jumpering ("chirp" white wire). See image below:
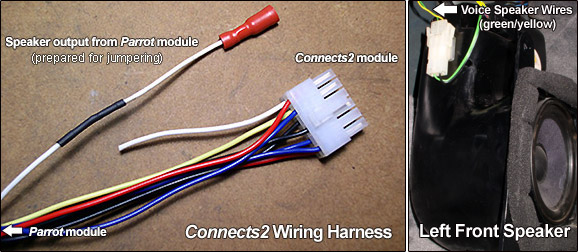
2) Remove glove box and lower trim (radio and OBC should be removed from mic preparation steps above). Remove shifter surround and locate left front voice speaker wire (green +), left of shift lever and bundled with brown factory mic wire. Voice speakers are grounded (yellow -) thru existing telephone transceiver (in trunk).
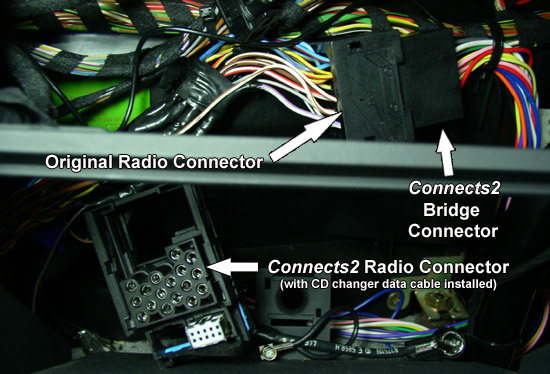
3) Remove CD changer data cable (or aux input) from original radio connector and transfer it to new Connects2 radio connector. Plug original radio connector into Connects2 bridge connector and, using tie wraps, secure the resulting wiring combo to upper air box in order to make room for new Connects2 radio connector. See image below:
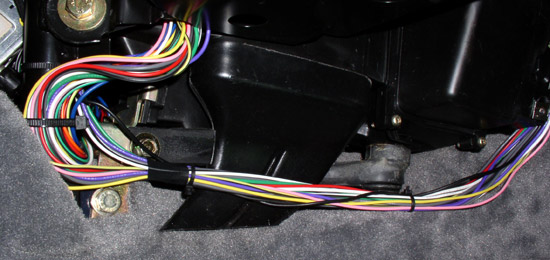
4) Carefully route Connects2 wiring with mic wire out bottom right of center console and down left side of passenger foot well. Secure with tie wraps. See image below. Be sure to leave enough slack in the new Connects2 radio wiring to allow for future radio removal!
5) Splice jumpered white "chirp" speaker wire from Connects2 harness into aforementioned green voice speaker wire located from step 2. TIP: In order to receive "chirp" notifications thru both left and right voice speakers, splice jumpered wire upstream of voice speaker signal splitter, located underneath rear center cubby space.
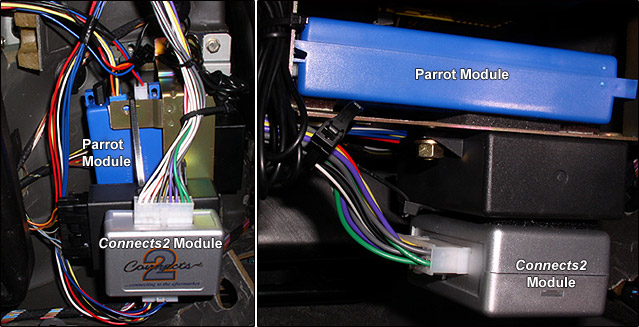
6) Utilize the mostly empty, upper right storage bracket behind glove box as a component mounting location. I used a combination of Velcro and tie wraps to secure the two modules. See images below:
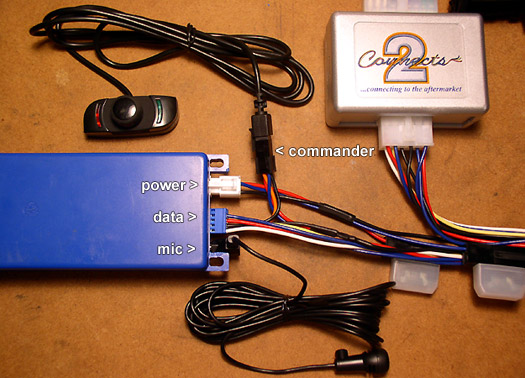
7) Once modules are secure, route remaining wiring up and out of the way. Use tie wraps. Plug-in Parrot module (plugs are coded for proper installation):
8) Route Parrot commander into glove box. I removed my (unused) rechargeable lamp base and used the resulting opening. Alternatively, route the commander to the center console area or any other convenient access point.
9) Before trim re-assembly, test installation. Enjoy!
Useage Notes:
- Minimize Parrot system volume for best sound.
- Mic location is loud and clear at slow speeds but road noise intrudes at higher speeds, making conversations at 75 mph less intelligible for the other party.
- If you turn off your actively paired phone but continue driving (with radio on or off), the Parrot module seems to complain: you will hear about 5-6 chirps each spaced about 2 seconds apart, as if it's trying to pair another device. Weird.
- Once your phone is paired, it will be recognized automatically from then on. The next time you enter your car (with phone on), the Parrot system will recognize it within about 15 seconds. You will hear a brief chirp notification whether your radio is on or off.
- Voice dialing (thru recorded "voice tags") is mostly unreliable. As noted, manual dialing will leave you much happier. However, an audible caller ID should sound for incoming voice tagged numbers (cool).
- There is no way to edit voice tags once created. The only way to "start over" is to reset the whole system, which clears all entries. So enter only a few, commonly called contacts. You can always add more...you just can't delete or edit.