Armrest & Double Cup Holder
- Model & Year: 91-97 8-Series
- Expertise: Beginner
- Date: September 2010
- Updated: December 2018
- Time Estimate: varies
Tools Required
- Woodworking tools (saws, sandpaper, etc)
- Cutting tools (ex: Dremel)
- Drill with various bits
- Other basic hand tools
Facilities Needed
- Work bench
Parts Required
Bavarian Autosport option:
- Bavarian Auto Armrest, p/n 01D0040 (black or beige leather), list: $74.95
- Z3 Cup Holder Valet, p/n 51168413622, list: $97.56
E46 option:
- E46 Upper Armrest (leather), p/n varies by color, list: $275.99
- Z3 Cup Holder Valet, p/n 51168413622, list: $97.56
- Underside Trim for Armrest, p/n 51168213648 (unlisted part)
- (optional) Armrest Lock, p/n varies by color, list: $9.18
- (4) Thermoplastic Screws, p/n 07129925827, list: $0.11
- Cabinet Hinge w/ Hardware (ex: Lowes item# 0228989), retail: $1.97
- 3/8" and 3/4" Plywood
- Various Screws
LeatherZ option:
- LeatherZ Mark2+ armrest (complete with ready-made armrest on Z3 cupholder valet, list $315 [see website])
- 3/4" plywood
- Various screws
Getting Started
One of the most lacking amenities in the 8-series is an armrest. The Bird Automotive company in England offered an aftermarket solution with internal storage (now out of production), but I always thought it looked bulky and sat too high.
The most popular idea has been to adapt the E46 armrest (with internal storage). Metal mounting brackets have been fashioned by members of the bimmerforums community. But this bracket has to be very strong to withstand daily use. It also has to be accurately made to fit neatly in the lower cubby space.
Unhappy with either approach, I developed two additional options using off-the-shelf parts, and found an interesting ready-made third option:
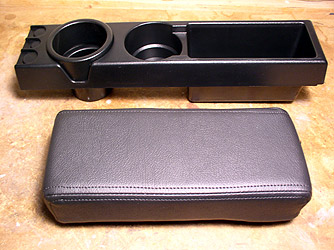
Bavarian Autosport Option
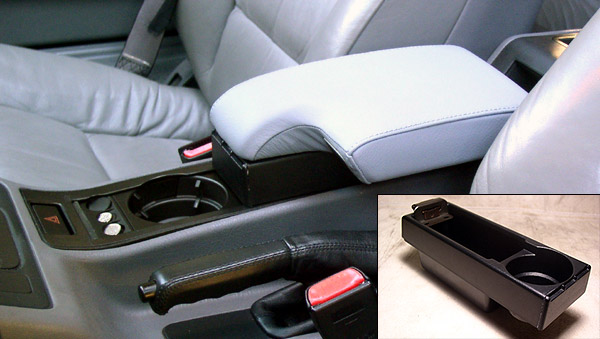
The simplest and most affordable solution is from Bavarian Autosport. It's an armrest made for use in conjunction with the Z3 center cup holder valet, and it's easily adaptable:
This approach requires minimal modification, comes in a soft and comfortable black or beige leather and - yes - adds two sorely missing cup holders to your car, too! The cup holder valet sits atop the center console with the armrest mounted inside the storing partition via an underside mounting block. The armrest is removable to allow access to the second cup holder and partition. It all results in a comfortable 3.75 inch rise above the center console while allowing access to the rear cubbies too. Cigarette lighter power sources can be wired thru a partition access cover.
Securing the valet to the bottom of the center console for stability is optional, but recommended. Modifications for valet fit are outlined in the procedure below. Once installed, add the armrest by simply pressing down.
The catch? At only 4 inches across, the armrest isn't quite wide enough to provide comfortable support for the driver's elbow. And using the second cup holder and partition while driving is a bit awkward, since the armrest comes off in your hand.
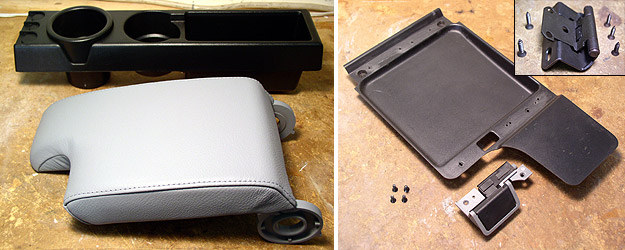
E46 Option
Building on the previous approach by using the Z3 cup holder valet again but this time adapting the wider E46 upper armrest and hinging it, provides perhaps the ultimate solution. Although more involved to adapt, this offers all three color choices in a factory part with an unobtrusive and comfortable rise of just over 3 inches:

Unlike previous attempts to adapt the E46 armrest, this installation doesn't require a strong mounting bracket to withstand daily use. Weight is instead distributed onto the center console area. Hinging it is required in order to provide both stability and allow more convenient access to the second cup holder and partition. And the forward facing rear cubby is still fully useable! As above, cigarette lighter power sources can be wired thru an access cover in the partition.
The E46 armrest must be modified by cutting the rear hinges off and precisely attaching a mounting block to the underside. It is then attached to a standard cabinet hinge, which is mounted to the back of the partition. The valet needs to be modified for best fit and, in addition, secured to the bottom of the center console for stability (see procedures below). For an even lower profile, try "the short option" under step 5 below.
E46 armrest parts - The factory parts diagram does not show the underside trim piece (required). You may want to obtain a complete armrest from a salvage yard or eBay. Dealers sell either the upper armrest (without underside trim) or the whole assembly (including mounting arm). Vinyl armrests are about $100 less but won't compare to leather.
LeatherZ Option
For those lacking time and tools, the LeatherZ company has developed an excellent third choice: a hinged armrest system also using the Z3 valet called the Mark2+ Armrest. $315. Available in colors. However, the valet still needs to be prep'ed for use in the 8-series and secured to the console (procedures below). See their website for more.
NOTE: The armrest hinges used above will not stay or lock in the up position without external support.
Procedure
The following two procedures are applicable to all three armrest options.
Cup Holder Valet Prep
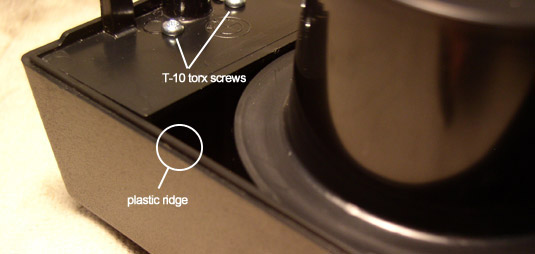
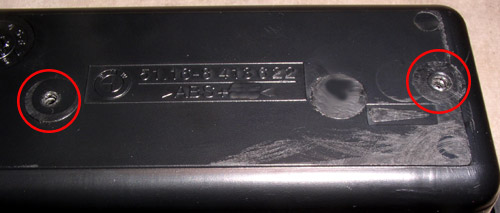
1) With new valet on workbench, remove the two T-10 torx screws which hold the coin springs. See image below. Now remove the raised plastic ridge from circumference of bottom of frame using a sanding tool or flat file. This will allow a flat surface for mounting.
2) (Optional) To use cigarette lighter as a power source, prepare connection. Then remove access cover from valet after removing the two Phillips screws. See image below. Note removed plastic ridge from previous step.
3) Back in the car, remove center console trim by removing the two phillips screws from bottom of center partition and also from underneath ashtray (if any). Disconnect both hazard light switch and lighter plug; move trim to workbench.
4) Invert trim and remove the four phillips screws that hold the ashtray to the trim. Remove ashtray and discard.
5) Return trim to center console and secure with screws. Insert new valet atop trim. Verify proper fit. (In front, you may notice a small gap [approx. 1/8"] between the bottom of the valet and center console. This is due to center console curvature and is unavoidable.)
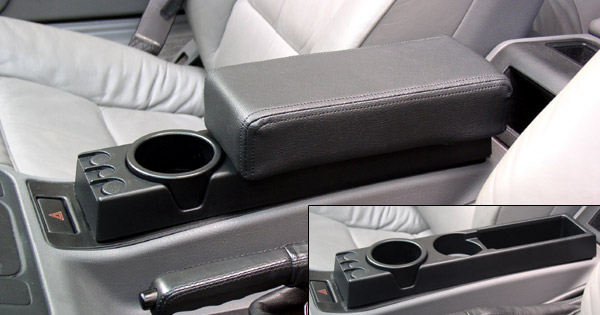
The Short Option - For those who don't like the extra bulk of the Z3 valet, cut off the front cup and coin holder to use just the rear section. This is a good option to pair with my Center Cup & Coin Holder modification, as illustrated in the image below:
To achieve this, simply cut with an appropriate saw between the two cup holders. Then, cut off the front edge and glue it to the front of your shortened valet. (See inset image above.) This can also be applied to the LeatherZ option.
Securing Cup Holder Valet
Securing the valet to the bottom of the center console is optional for the Bav Auto armrest but required for the E46 or LeatherZ option. This can be accomplished in different ways. I chose to build a wood adaptor block to fill the empty space between the bottom of the center console partition and the underside of the new valet's partition. Specifically, two pieces of 3/4" plywood are joined to provide the necessary 1.5" rise and offer a secure mounting surface. Oak plywood is better quality and stronger, and is used in my example here.
The following diagram (not to scale) and image should provide guidance for the woodwork required:
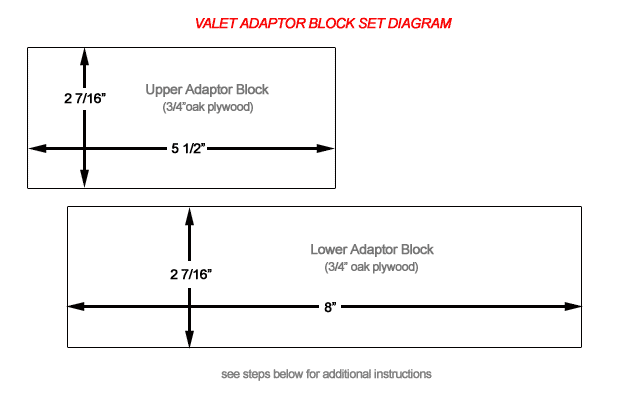
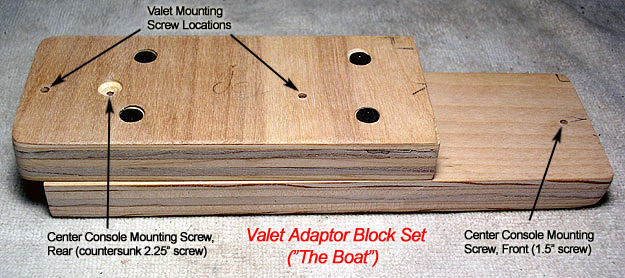
1) Cut two adaptor blocks as shown in diagram above. NOTE: Lower block dimensions need to be accurate, but upper block dimensions are not critical and may be approximate.
2) For a snug fit, round off the rear corners of the upper block, along with the lower edges and front corners of the lower block. Test fit inside partition after sanding. See image above.
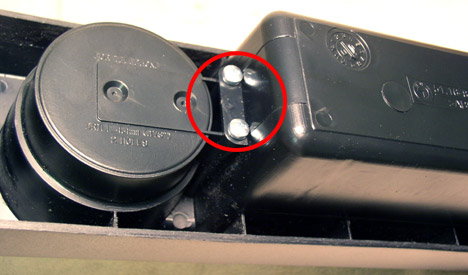
3) Offset upper block rearward about 1/2" from the lower, to receive the rear mounting screw from the new valet. Secure both blocks together using four countersunk 1" screws as shown in image above.
4) With center trim console removed and on work bench, place mated adaptor blocks in center partition and mark the two console mounting screw locations thru bottom. Drill pilot holes completely thru adaptor block marked locations to receive a 1.5" screw (front) and 2.25" screw (rear). Rear screw needs to be countersunk. See image above.
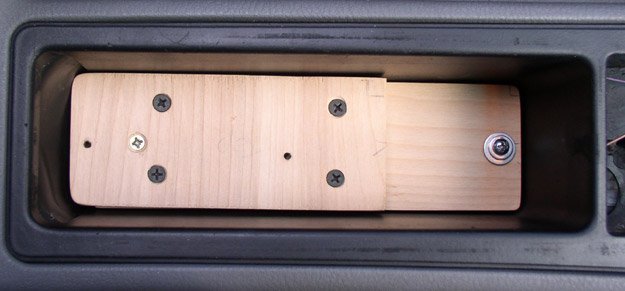
5) Install center console trim back in car and insert adaptor block inside partition. Secure block with screws thru console locations. Check fit. It should look like this:
6) Working with new cup holder valet, flatten the bottom of the partition by removing the tab and screw hole rise with a sanding tool or flat file. See image below:

7) Drill pilot hole in front screw reinforcement area of partition. See image below. Rear mounting screw location should be pre-drilled. Note removed tab and rise from previous step.
9) Install new valet atop console. Note and mark valet's screw locations on top of upper adaptor block. Remove adaptor block and drill 1/2" depth pilot holes in marked locations.
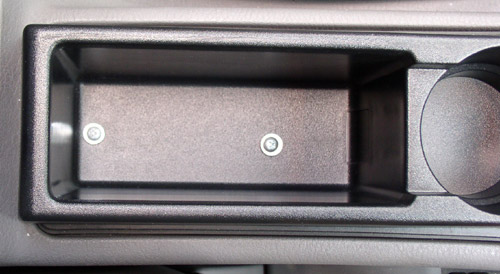
10) Re-install adaptor block and then valet. Secure valet using two 1/2" screws with washers thru pilot holes. Inspect fit and finish. Verify security of installation. See image below:
As a final touch, place included black mat in bottom of partition to cover screws. TIP: underneath the mat, cut and install filler material around the screws approximately the same thickness as the screw height, to yield a flat bottom.
E46 Armrest Adaptation
Just as in securing the cup holder valet, adapting the E46 armrest uses a similar approach. Two wood mounting blocks need to be made: a base block from normal 3/8" plywood, and a mounting block from 3/4" oak plywood. The mounting block secures the armrest inside the valet's partition (just as with Bavarian Auto option), while a cabinet hinge is secured to the rear of the partition and attaches to the mounting block.
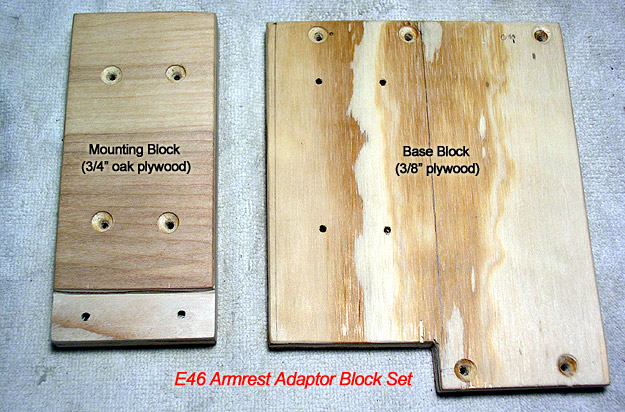
The procedure offered here is open to improvisation. Dry fit and test parts as you go. The following diagram (not to scale) and image should provide guidance for the woodwork required.
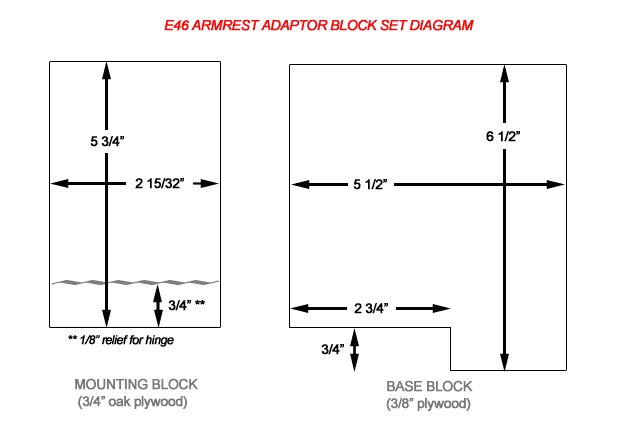
1) Cut two adaptor blocks as shown in diagram above. NOTE: Mounting block width (just under 2.5") needs to be accurate. Hinge relief on mounting block should be about 1/8" deep, but this may depend on hinge type used. Base block width is not critical and may be approximate.
2) For a snug fit, slightly round off the bottom edges and front corners of the mounting block. See image above. Test fit inside valet's partition after sanding. The block should be firmly level with the rim when pressed into position.
3) Prepare armrest by cutting off both plastic hinges. A Dremel tool with cutting wheel works well for this. Also, remove additional material from the right side (passenger side) hinge area to make way for new cabinet hinge. See image below:
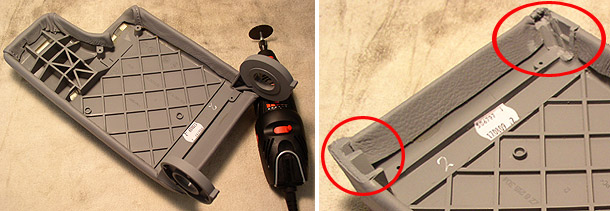
Since the rear edge of the armrest will serve as a back stop for hinge movement, remove protruding plastic corner from right hinge area (passenger side) until leather overlaps. See image above.
4) If using matching armrest lock (to fill cut-out space), cut off plastic catch; install using two factory thermoplastic screws. Then install underside trim and secure with two thermoplastic screws.
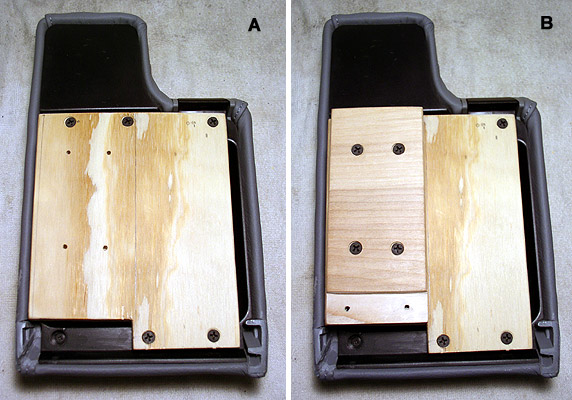
5) Place plywood base block atop underside trim. With block as far left as it will go, use a hand drill to make 5 pilot holes thru wood and into plastic trim frame. Countersink holes and secure to armrest with five 1" screws. See frame A of image below. TIP: drywall screws work well here.
6) Drill and countersink four pilot holes in mounting block (as shown in "E46 Armrest Adaptor Block Set" image). Then, center receiving plate of cabinet hinge flush with rear edge and mark screw locations. Drill 1/4" depth pilot holes into marked locations.
7) With mounting block firmly in valet's partition, overlay armrest with installed base block and note location. Remove mounting block and place on base block. It should rest flush with rear and about 1/8" from left side of base block. With mounting block in its final position, use hand drill to complete pilot holes into base block. Secure mounting block with four 1.5 " wood screws screws. See image above, frame B.
Important: Use of 1.5" wood screws completely thru the base block plywood here is very important. This joint bears all of the driver-side loads and needs to be very strong. Take your time with this step. This determines where the armrest will sit over the valet. Front tip of armrest should not interfere with front cup holder opening.
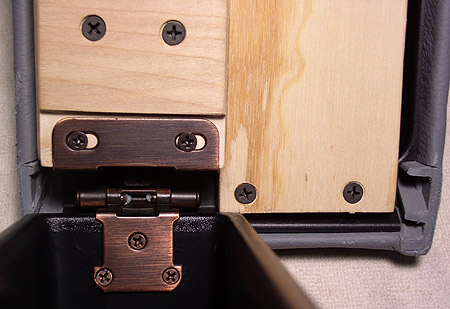
8) Center cabinet hinge at rear of valet's partition and note screw mounting locations. Secure with matching hinge hardware. See image below. TIP: Using a bulky hand drill to create pilot holes here is not a good idea. Instead, use the point of a hot soldering iron to burn screw locations while holding hinge plate. Then turn screws thru marked locations by hand.
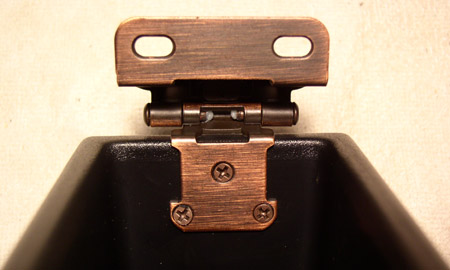
9) Place armrest with attached blocks into receiver end of hinge and loosely fasten the two mounting screws. Open/close assembly to determine final resting position before fully tightening hinge receiver screws. See image below:
10) Once satisfied with installation, you may remove the adaptor blocks for painting (flat black). Install and secure cup holder valet as shown in previous section, then install armrest using step 9 above. Test movement of armrest along with overall fit & finish. You're finally done! See image below. Note partition mat and painted adaptor blocks. Enjoy!

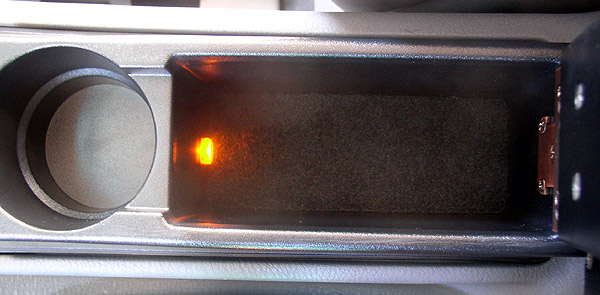
Lighting The Partition
Optional - The partition becomes a black hole at night. Solve this problem by making use of your old ashtray light while adding a real "touch" to your installation. See image below. This procedure is open to improvisation. My approach was to use the orange lens from the old ashtray and a light holder from an E36 ashtray.
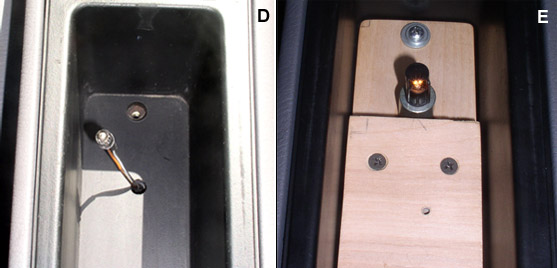
1) Remove the access cover from the partition and drill an appropriate hole for the lens. See frame A of image below.
2) Cut off a light bulb holder from any BMW ashtray and, using a spacer sleeve of matching diameter, combine them to provide the approximate 1.75" rise needed. Drill a matching hole in the lower mounting block - completely thru so as to provide wiring access. See frame B and C of image below.
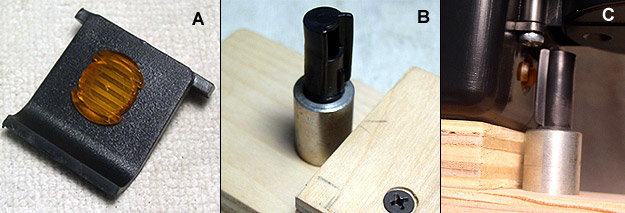
3) Remove center trim and drill a hole for wiring access (drill thru lower trim frame too, being careful not to damage any wiring on the underside). See frame D of image below.
4) Install adaptor block with wired light (see frame E below). Now install armrest and enjoy!