Securing Auto-Fold Mirrors
- Model & Year: 95-01 7-Series, U.S.
- Expertise: Beginner
- Date: July 2016
- Updated:
- Time Estimate: 4 hours (including both sides)
Tools Required
- Basic hand tools
Facilities Needed
- None
Parts Required
- None
Getting Started
Are your auto-fold side mirrors loose and wobbly, shaking in the wind at speed? Does the mirror movement frustrate your scan when changing lanes or otherwise simply get on your nerves? This is a common problem; one which I find particularly annoying. Below is a short video of the problem (with mirror and trim removed):
Some people claim that cycling the mirrors (fold/unfold) will remove gear "slop" which is the root cause of the wobbly mirror problem. But this did not work in my case. At no point in years of car ownership did I ever think: "gee, I wish the mirrors folded themselves".
Since this auto-fold feature is about as useful as sunscreen on a submarine, I discovered a way to secure the mirrors at the expense of the auto-fold function. It is possible to essentially jam the mechanism open, locking the gears in the full open position.
Afterwards, the auto-fold function no longer works, and pressing the "fold" button will do nothing (mirror motor won't run). However, your mirrors will be solid as a rock and the fix will cost you nothing. Of course, the mirrors can still be folded manually, and still flex in both directions. Auto mirror adjustment is not affected, nor is mirror memory. In other words, they will become like "normal" mirrors.
To me, this is an upgrade.
Procedure
Remove Mirror & Trim
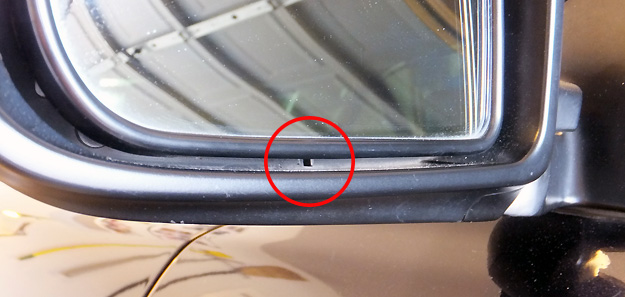
1) Locate mirror locking tab beneath mirror. See image below. Using a small screwdriver or other tool, slide tab to the right to unlock and release mirror.
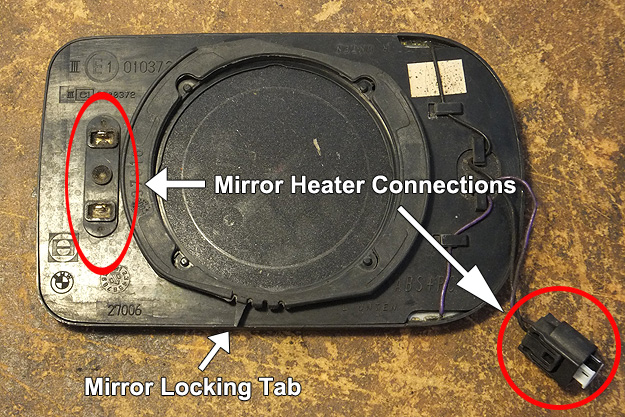
2) With mirror loose, disconnect heater wire connections and set mirror aside. See image below:
3) Remove outer trim cover by pulling trim way from frame while releasing the four (4) retaining tabs with a flat blade screwdriver or similar tool. Use care not to break tabs. See image below:

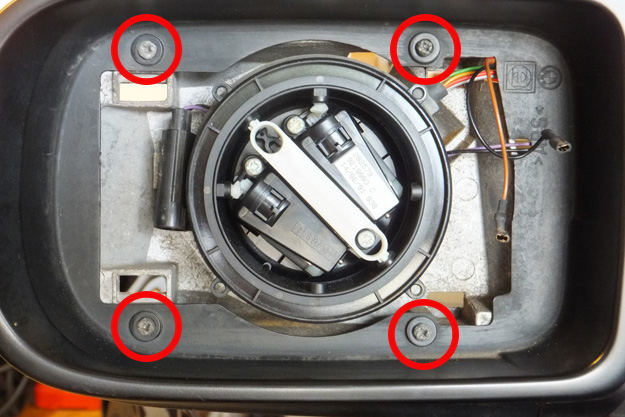
4) Remove the four (4) screws holding black inner trim and remove inner trim:
5) Your mirror should now look like this:
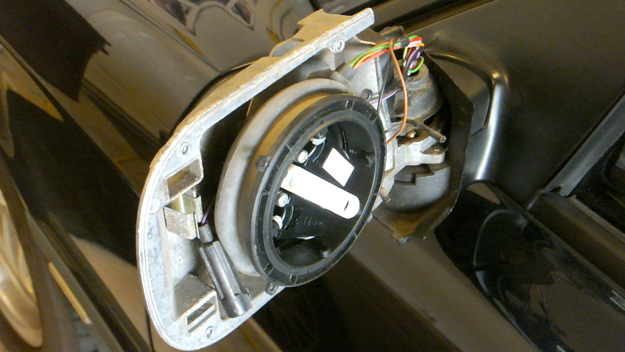
Pause to marvel at the mirror wiring bundle (about 10 wires total). Should a mirror really be this complicated?
Secure Mirror Gear
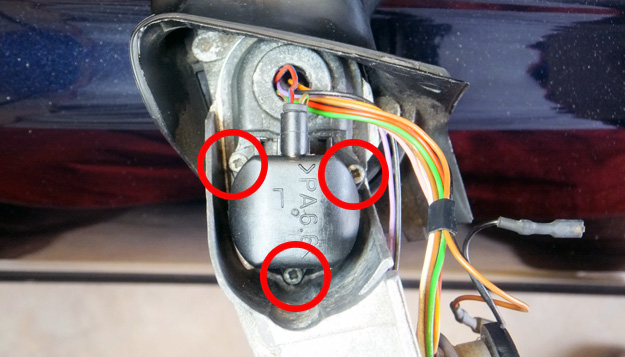
1) Remove mirror motor assembly by removing the three (3) motor cover screws:
2) Gently pry up motor assembly (at base, not motor cover) while keeping it level. Then slide assembly (with its gasket) up along wiring bundle, out of the way. This will expose the internal gears.
For fun, wiggle mirror frame and note how loose mirror is. Watch the gears. Once again, marvel at the complexity of German (over-?) engineering with such a minor, even trivial function.
3) Carefully lift up and remove the jackscrew gear (which engages the ring gear). See image below:
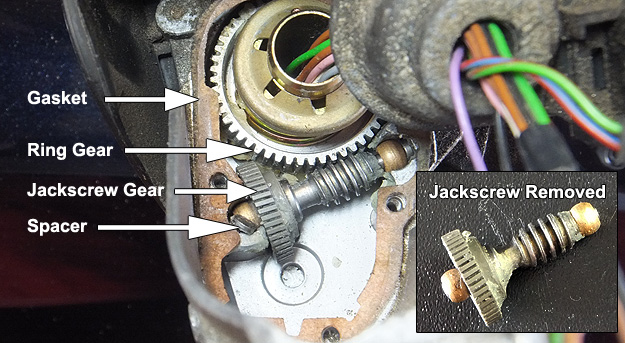
NOTE: There are two very small magnetic spacer discs (which look like tiny batteries) that insert between the ends of the jackscrew gear and the frame. Do not lose these. (Left spacer shown displaced [above], for clarity.)
Your mirror should now move freely, pivoting smoothly without interference from the jackscrew. Try it.
4) Move mirror to its fully extended position and re-install jackscrew gear.
Be sure spacers are in place. Turn jackscrew while pressing it in place to help it mesh with ring gear.
5) Remove any "slop" in jackscrew by applying inward rotational pressure to it by hand (towards car), while holding down rear bearing of jackscrew with other hand (to keep it in place).
With jackscrew "snugged", gently attempt to wiggle mirror to verify gears are locked. There should be absolutely no mirror movement or gear slop.
This step is key to the procedure. Do not proceed to step 6 until you're confident the mirror is locked and secure. Furthermore, it may be possible to skip steps 3 & 4 by simply performing step 5 to roll mirror to its fully extended position.
6) Re-install motor assembly.
Begin by sliding gasket back in place. Then, position motor assembly over gasket.
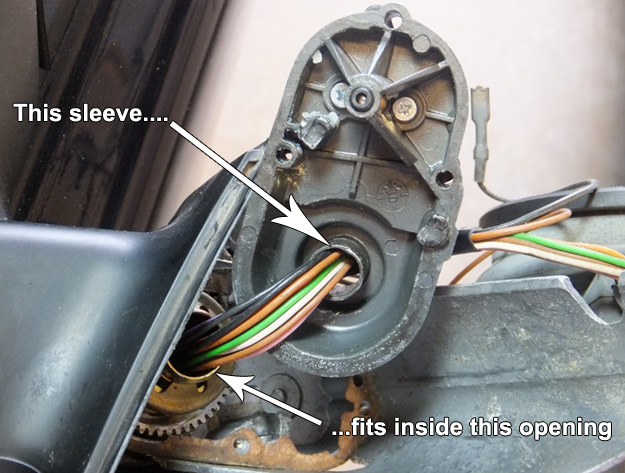
Verify sleeve on underside of assembly is aligned with opening of mirror pivot. See image above. Since you will be working blindly to align these parts, use gasket perimeter and motor screw holes as a guide. The assembly must be held level while pressing it back in place.
NOTE: Forcing assembly to seat will damage sleeve, preventing re-assembly, and will require physical removal of sleeve. (Ask me how I know.) If assembly does not want to seat, re-position and re-align. The sleeve is a tight fit and will provide some resistance. Press with your thumbs on top of the assembly in an even and distributed manner.
TIP: Apply a small dab of liquid gasket to gasket seal to help "tack" it in place and prevent it moving around.
7) Re-verify mirror is secure, then re-install the three motor screws to secure motor assembly.
8) Reassemble trim and mirror in reverse order.
Done! Now, after all those years of putting up with it, you finally have wobble-free mirrors!