Seat & Trim Removal
- Model & Year: 91-97 8-Series
- Expertise: Beginner
- Date: April 19, 2011
- Updated:
- Time Estimate: varies
Tools Required
- T10, 15, 50
- Other basic hand tools
Facilities Needed
- Garage (dry, secure work area)
Parts Required
- As needed (see RealOEM.com for part numbers)
Getting Started
The seats in the BMW 8-series are an engineering feat of their own. There are a host of electric motors, gears, wiring, heating elements (for heated seats) and air pumps (lumbar support) buried inside. Since the 8-series has no B pillar for seat belt anchoring, the seat backs must withstand crash forces and are built correspondingly strong and heavy. This is one reason they weigh about 70 pounds.
Removing the seats can help with repair issues such as the notorious "uneven seat lift" problem, or to replace broken plastic trim pieces or defective switches. In some cases - such as replacing the lumbar air pump - it may only be necessary to remove the seat back.
While two people are recommended for seat removal, it works well with only one person lifting. Just be prepared for the weight and use safe lifting practices. Once the seat is out, you may be surprised at what you find hiding underneath! It's also a good time to clean the carpet.
Procedure
Seat Removal
1) Lower both windows on appropriate side. Remove floor mats. Turn off dome light.
2) Raise seat and move fully rearward. Remove T-50 bolt from front of each seat rail (1 each, 2 total), directly under seat pouch.
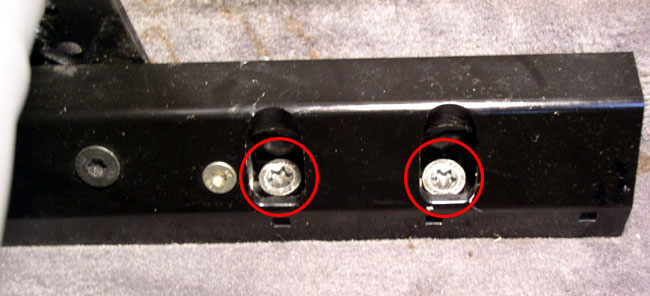
3) Move seat fully forward. Remove T-50 bolts from rear of each seat rail (2 each, 4 total). See image below:
4) Using small screwdriver, pry up and remove plastic rivets from electrical cover (2). Lift out plastic pins. Remove plastic cover. See image below:
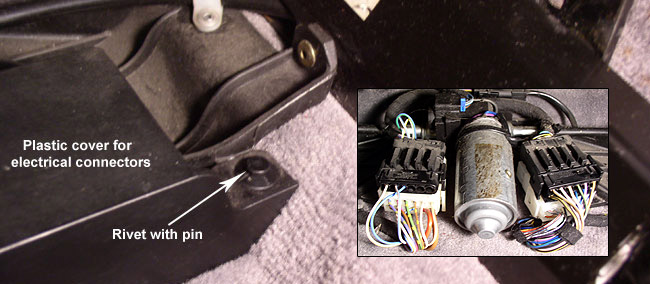
5) Disconnect wiring harnesses (4, yes four!). Seat is now free.
6) Tilt seat back, against front of rear seat. Roll/pivot seat over on its side, with front of seat protruding from door opening. Lift seat out while turning away from open door. Be sure to grip seat frame, not plastic trim.
Installation is reverse of removal. Note seat pin locations (under rails) for proper seat placement.
Seat Back Removal
1) Lower all windows. Turn off dome light. Fully lower seat and move fully forward.
2) Remove headrest by pulling firmly while using a twisting motion. This works best by grabbing headrest from opposite seat.
3) Remove rear half of headrest elbow cover by inserting a fine pointed tool into the two small openings (one each side) shown in frame A below (red arrows) while gently prying with a screwdriver. The arm's upper catch (frame A, white arrow) is released by simply prying and pressing gently. Frame B shows outer catch being released.
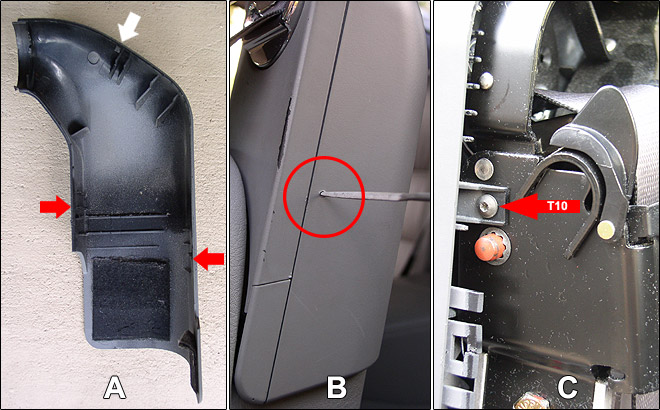
4) Remove front half of cover after removing the two (2) T10 torx screws shown in frame C above (one per side). Slide cover down seat belt.
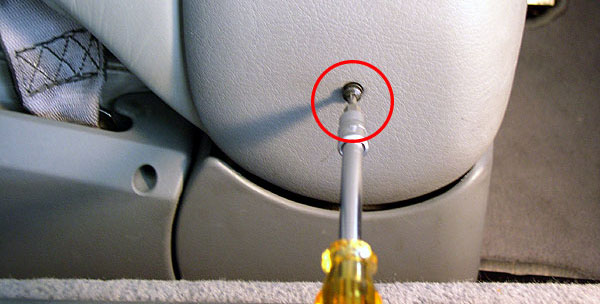
5) Raise seat and remove the two (2) lower seat back screws using T15 torx (remove black plastic covers first, if present). See below:
6) Lift seat back up and off. This is best performed from seated position in rear seat. Pivot loose back around seat elbow and rest in front of seat.
Lumbar Support Repair: Coffee fouled switches and/or cracked air pump casings (frame B below) can prevent your lumbar support from working or holding air.
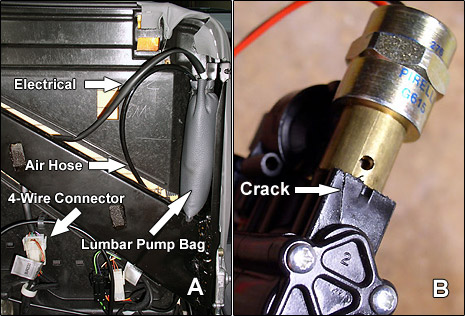
With seat back removed, locate air pump tucked in leather bag (frame A above). Snip the air line and disconnect plug to replace. New pumps come complete with bladder (not needed). The air line is reinforced with a metal coil to prevent kinking.
The lumbar switch can be replaced (or cleaned) after removal of inner plastic trim (seat removal required).
- Lumbar Support Air Pump/Bladder, p/n 52 10 1 940 882, list: $209
- Lumbar Support Control Switch, p/n 61 31 1 393 363, list: $108
Installation is reverse of removal. Be sure to locate the upper catches inside seat back cover into the notches of seat frame when lowering it into position.
Seat Trim Removal
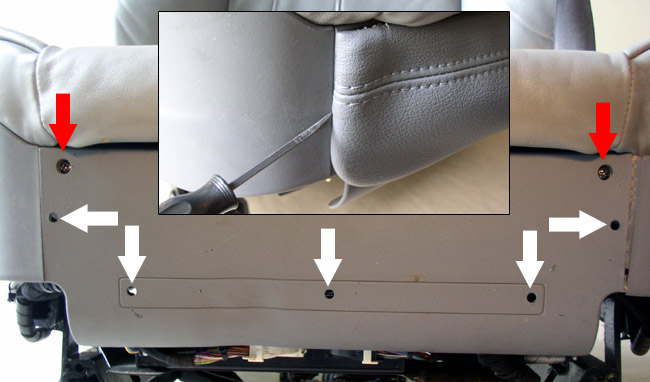
1) With the seat out (or in place), remove plastic trim pieces by starting at the front and working around to the side. Begin by prying with a screwdriver around the five (5) seat pouch attachment points. See image below (white arrows and inset). Remove pouch.
2) Now revealed are the two main screws which hold front and side trim together. See image above (red arrows). Unscrew and remove front trim piece. Marvel at wiring, seat lift motor, and memory module.
Uneven Seat Lift Repair: The lift cable can slip out of its motor, causing lop-sided seat lifting. With front trim cover off, locate cables on each side and remove bolts with retaining plates. See image below.
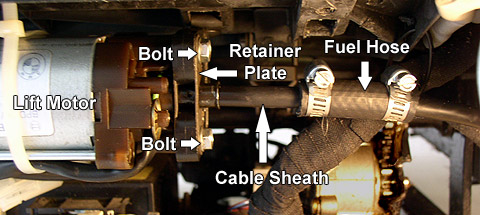
Cut sheath about 5 inches from motor end and remove from cable. Cut off additional 2 inches from removed sheath. Insert a 2-inch length of fuel hose onto cable with reduced sheath. Position sheath end so that 1/2-inch of cable protrudes and secure inside fuel hose with hose clamps. Re-install in reverse order.
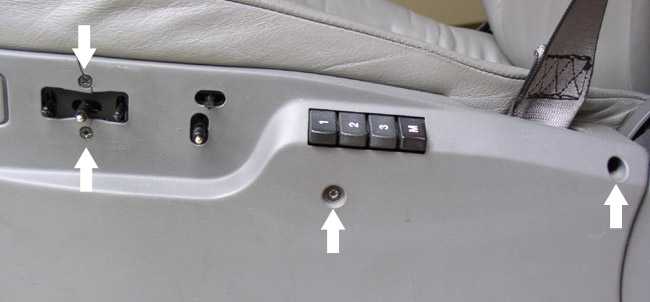
3) Remove side trim by pulling or prying gently on seat adjustment switch covers to release. Remove the two revealed screws, along with the two additional mounting screws (could be torx or phillips). See image below (white arrows).
Inner side cover is removed similarly. Seat memory, seat adjustment modules, lumbar switches, seat belts and anchors, etc., may now be accessed or replaced.
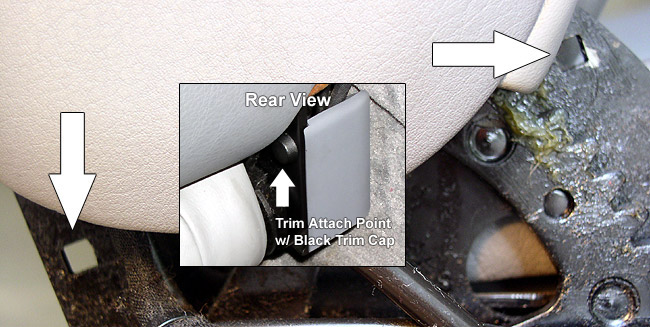
4) Remove seat back base trim by pinching plastic tabs together after removing black plastic cover caps (if present) from each of the two mounting points on seat frame (see image below). The rear tab is accessed from behind seat while the front tab is visible between seat back and lower cushion.
The black sliding seat belt covers (with springs) are removed from the base trim by prying off the clip attached inside.
Installation is reverse of removal.