Tailgate Strut Replacement
- Model & Year: 99-03 5-Series Wagons
- Expertise: Beginner
- Date: September 2015
- Updated:
- Time Estimate: 2-3 hours
Tools Required
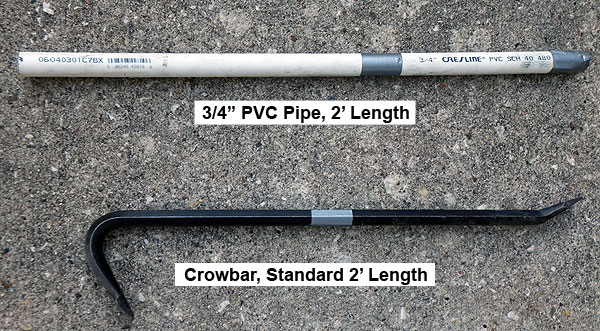
- 3/4" PVC Pipe or similar (2' length, see below)
- Crowbar, standard 2' length (see below)
- 2x4 Lumber or similar, 54" length
- T20 Torx Driver
- Magnetic Pick-Up Tool
- Pick Set
- Duct Tape (or similar)
- Work Light
- Basic Hand Tools
Facilities Needed
- Garage (or solid surface)
Parts Required
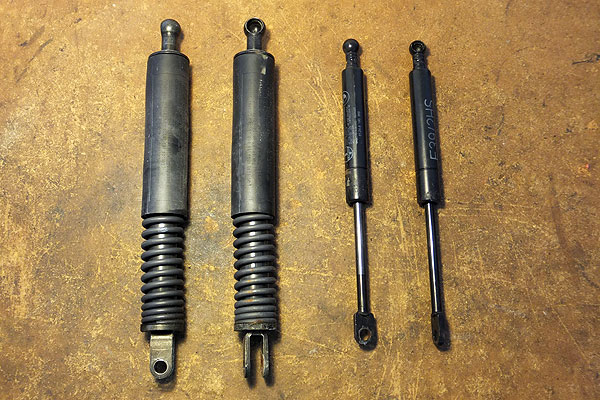
- Tailgate Lift Struts (2), p/n 51 24 8 220 072, $67.93 each (list price)
- Rear Window Lift Struts (2), p/n 51 24 8 190 688, $41.57 each (list price)
Getting Started
After opening the tailgate, does it fall back down on your head? Does the tailgate feel heavy or otherwise not open smoothly? Does your rear lift window do the same? By now, most Touring (or Wagon) owners are having trouble handling their tailgates and rear windows due to failing lift struts. Fortunately, this is a fairly simple and inexpensive DIY repair. Buying from online discount houses, your parts price should be under $200.
The lift struts are buried deep in a cavity in the rear portion of the roof. Therefore dropping the rear section of the headliner will not help. You must work blindly and by feel to access the forward strut mounts, which are nothing more than ball bearing-like spheres on top of 1" stands.
BMW offers a special tool for this purpose, and there are shops that rent this tool via postal mail. However, this job can be accomplished just as easily using ordinary tools and supplies (see Tools Required above).
Among the tools outlined above, the magnetic pick-up tool will be very helpful in retrieving dropped T-20 torx screws and circlips, which will -- most definitely -- fall into the crevice between the liftgate and roof while working. Duct tape or other heavy-duty tape will serve several helpful purposes too.
Procedure
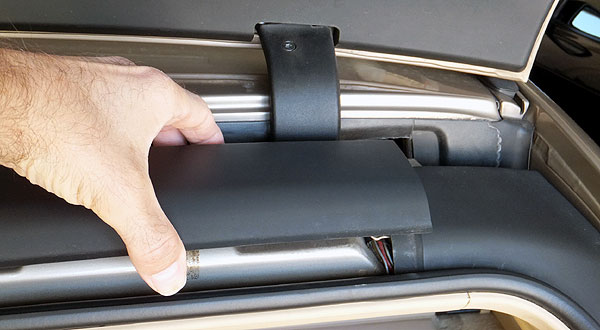
1) Open rear window glass fully. Carefully lift/pry up the center trim peice on the upper tailgate. See image below:
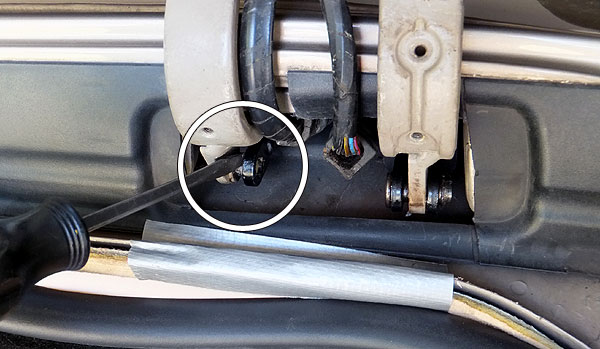
2) Release the two exposed T-20 torx screws which hold the black plastic trim to the window hinges on each side.
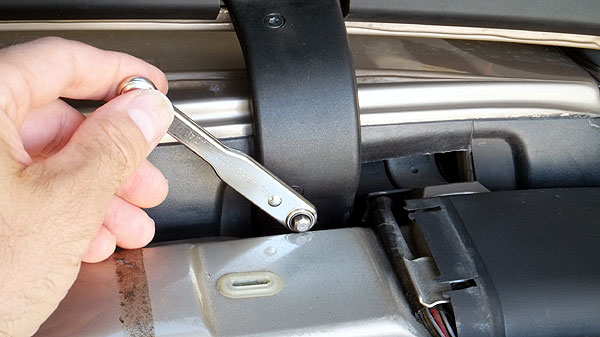
The bottom torx screw may be difficult to reach even with center trim removed. Use a torx bit in a right-angle driver (as illustrated above) or a long driver. Keep a magnetic pick-up tool handy to retrieve dropped screws.
Then, use a small screwdriver or similar tool to release the tabs holding the electrical wiring cover to the hinge cover. Release wiring and remove both hinge covers.
3) Close rear window and open tailgate. Repeat step 2 to remove both tailgate hinge covers.
4) Pull up and release tailgate seal around upper area of tailgate opening. Apply a few layers of duct tape to the upper tailgate opening (where the seal was just removed) immediately outside the strut cavity. This will provide a measure of protection against scratches.
5) Prop tailgate fully open using 54", 2x4 lumber or similar, as shown below:

You're now ready to replace the struts.
Window Strut Removal
1) Starting with the smaller window strut first and working on one side at a time, use a pick tool to remove the circlip holding the outer strut mount to the window hinge. Then use a screwdriver or similar tool to pry the window strut off its outer hinge as shown below:
Note duct tape laid in place of tailgate seal, from step 4 above.
2) Working between the hinges, insert loose window strut completely inside 3/4" PVC pipe (or similar). Press down firmly on outer end of pipe. The leverage provided by the pipe should release the inner strut mount with a distinct click sound and feel. Extract loose strut.
Tailgate Strut Removal
3) Use pick tool to remove circlip holding tailgate strut pin to hinge. Remove strut pin.
With pin removed, the larger tailgate strut cannot be inserted into a length of pipe, as with the window strut. This is due to its U-shaped end which stradles and traps the hinge (probably for safety). This requires a slightly different approach:
4) Angle a crowbar under the tailgate strut, close to its upper mounting point. Press down firmly on crowbar until you hear and feel the strut release from its mount. Push strut forward, off the hinge, and extract loose strut.
Congratulations! You've just removed both defective struts. Now it's time for the slightly harder task of installing the new struts. Install struts in reverse order, beginning with the larger tailgate strut, then the smaller window strut.
Tailgate Strut Installation
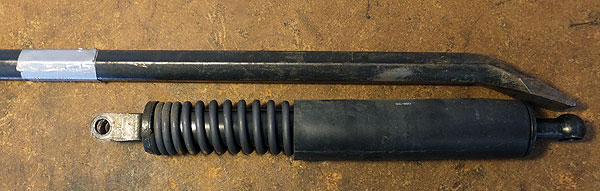
1) Wrap a piece of duct tape around the crowbar at a point approximately the same length as the new tailgate strut. See image below. This will serve as a depth marker.
2) Insert new tailgate strut into cavity and position its U-shaped end onto the hinge. Grease and insert hinge pin and attach circlip, securing strut's outer mounting point.
3) Using a work light, position tailgate strut so that its inner end rests on top of the ball of the inner mount point. It may take several attempts to balance it correctly, with very limited visibility.
4) Slide crowbar into cavity from an angle (as in step 4 above), up to the duct tape marker, and carefully place its end on top of the tailgate strut. Pull up firmly on crowbar until you hear the strut seat onto the ball of the inner mount.
It's very important that you hear and feel the strut seat correctly. If not, there is a danger it may come loose in the future, with the tailgate collapsing on someone's head. As a test, reverse the procedure as if you're trying to remove the strut: pry downwards from underneath the strut, but only lightly. The strut should not budge.
Window Strut Installation
1) Insert new window strut into 3/4" pipe until only 2" protrudes. Apply duct tape to temporarily attach strut to pipe. See image below:
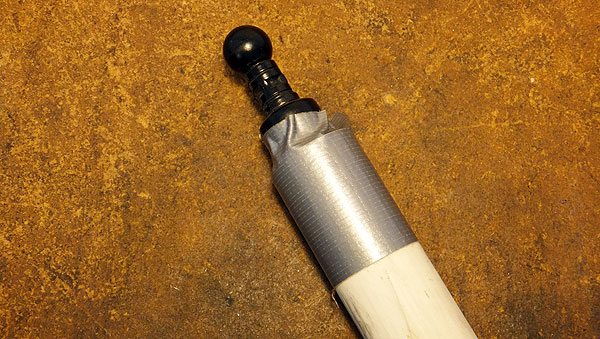
Lay second window strut along side of pipe and mark depth of inserted strut with a duct tape wrap on pipe, similar to technique used for tailgate strut and crowbar above.
2) Insert 3/4" pipe with attached strut into cavity up to duct tape marker, noting correct orientation which puts strut end in a downward-facing position. Carefully place strut end on top of ball of inner mount (as in step 3 above). Pull up firmly on pipe until you hear the strut seat into ball end of inner mount.
3) Pull 3/4" pipe off attached strut (with tape). As in step 4 above, test the security of your installation by prying lightly upwards on strut; it should remain in place.
4) Attach outer end of strut to greased window hinge and secure with circlip.
After repeating this process on the other side, feel free to test your 4 new struts by opening/closing both tailgate and window. Tailgate should open with one hand and extend fully without any help; the window too.
Re-install hinge covers and trim in reverse order. You're all done!