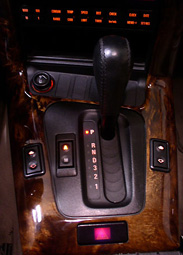
Auto Shift Knob Upgrade
- Model & Year: 92-95 3-Series
- Expertise: Intermediate
- Date: February 22, 2002
- Updated:
- Time Estimate: 6-8 hours
Tools Required
- Metric allen wrenches
- Other basic hand tools
Facilities Needed
- Work Bench
Parts Required
- Shifter Arm, p/n 25 16 2 228 145, $52
- BMW shift knob of your choice, $100+
Getting Started
 This procedure will allow a pistol-grip auto shift knob to be installed on pre-'96 E36's. This type of knob tends to have a sportier look and feel over the stock t-handle knob. What complicates this otherwise simple task is the need for a new shifter arm, not required for post '96 models.
  Once the arm is changed, it will accept all shift knobs from '96-on.
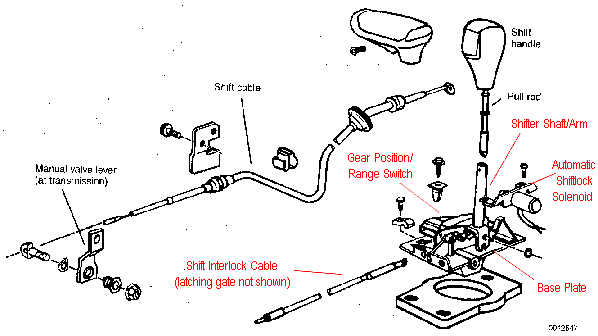
Changing out the shifter arm is 99% of the job. The new arm is shorter and cut slightly differently to fit these knobs. See image right.
Due to the way the new arm is made, the shiftlock solenoid (mounted on the base plate) is effectively bypassed. Ordinarily, with the engine running, the shiftlock solenoid prevents you from shifting out of P or N without first depressing the brake pedal. This is fine with me, since I like to select N when waiting at long stop lights and then drop it in gear when the light turns green, all without touching my brake pedal. The shift interlock cable still prevents shifting out of P with the key removed and engine off.
IDEA: You can also update your shift cover. Early shift covers utilize a small bulb to illuminate a light bar which carries light to the gear position indicator. '96-on cars use a small LED to directly illuminate gear position a bright red.
You'll also need the female electrical connector for the new shift cover (not a dealer part; visit a salvage yard and clip it off yourself). Simply splice it in place of the existing light bulb.
The new cover also repositions the tranny mode switch in a new trim bezel, reducing confusion with the driver's window switch. I use touch to operate the window and have often pressed the tranny mode switch by mistake. See images below.

Procedure
1) Begin by removing the old shift knob, shift cover on center console, and OBC with shelf. You can leave the center console in place, which is a big time saver.
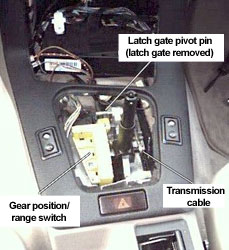
2) On my car, one of the gear position/range switch mounting bolts was blocked off by the latching gate, which was itself blocked off by the gear position switch again. One has to come out first. So to get clearance for removing the latch gate, I removed the top cap from the yellow plastic gear position switch. See also Bentley sec 250, pg 4, fig 8-10. Unclip latch gate holder and spring from pin, detach cable, and remove latch gate.
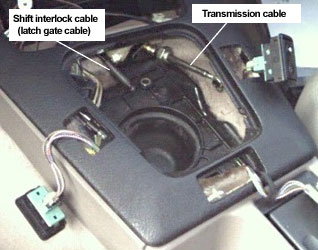
3) Remove yellow gear position switch and shiftlock solenoid. Next, unclip the transmission cable from shifter arm and release the set screw holding it to the base plate. The center console ashtray is a good place to keep the small parts.
4) Unscrew the three bolts holding the base plate to the transmission housing. Next, to get the clearance you need to remove the base plate with its attached shifter arm, rotate it 180 degrees, tilt it back towards the rear of the car, and squeeze it out through the center console. You're now half done!
5) On a work bench or solid surface, remove lock washer and drive out the pin holding the shifter arm to base plate and remove arm. Install new shifter arm after greasing pin. Be sure to re-use the black tubular trim piece from stock arm.
Installation is reverse of removal, noting the following:
- Due to the new shifter arm's wider "U" shape, the interlock's latching gate may not align on its pin and bind on the shifter arm. Shim the latch gate with a washer to obtain the needed leftward clearance. It's a tight fit in there between the latching gate and the gear position switch!
- Thoroughly test your installation for freedom of movement and check that the interlock cable is functioning. You may need to adjust this cable.
- You will note that the shiftlock solenoid is now no longer effective, as its movements don't contact the new shifter arm.
- Lube the shifter cable while you're there.
Finishing Up
Once it's all back in, you're ready to finally install the new shift knob! I applied some grease to the knob's drop pin to help it move freely inside the shifter arm. Push the new knob all the way down on the shaft and Voila!