Door Microswitch Replacement
- Model & Year: 92-94 3-Series
- Expertise: Intermediate
- Date: May 24, 2003
- Updated:
- Time Estimate: 4-6 hours
Tools Required
- Torx bits: T-30, T-20, T-9* (*yes a T-9.)
- Tie wraps
- Flashlight
- Bentley service manual (optional)
- Door panel mounting clips (optional, to replace broken ones)
- Other basic hand tools
Facilities Needed
- Work bench
- Garage or level surface
Parts Required
- (L) Door Microswitch Assembly, p/n 51 21 8 208 423, $39.06 list, or
- (R) Door Microswitch Assembly, p/n 51 21 8 208 424, $39.06 list
Getting Started
Doesn't your dome light come on when you open the door? Does your central locking do funny things? Can you open your door and leave your keys in the ignition without the warning chime sounding? If so, you probably have a bad microswitch assembly in the door jamb lock unit. Replacing this switch is a royal pain, but a fairly straightforward DIY job. The door panel will need to come off, and the whole door lock assembly removed from inside the door.
This procedure applies to all cars built prior to 9/93, which includes part of the 1994 model year. How do you determine your build date? Look in the driver's door jamb on the data plate.
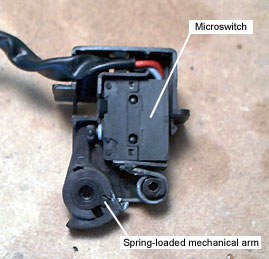
NOTE: I found my microswitch to be okay. The mechanical arm failed by no longer making strong contact with the tiny switch (see images below). So don't be tempted to replace just the microswitch. The whole assembly may be faulty. Fortunately, BMW only sells this microswitch as a complete assembly (p/n above).
I don't think BMW could've devised a more complicated switch and should win some kind of Rube Goldberg prize for this - but I digress. BMW came to their senses and eliminated this switch beginning with 9/93 production. All earlier cars will have 2-3 microswitches inside the door.
Additional points:
- 3-series cars have notorious door panels. The panel clip holders tend to separate from the door panel when it's removed, along with the door bins. You'll need to glue them back on with a good epoxy and let them set-up overnight (with C-clamps in place) before reinstallation, so make proper time allowances.
- Coupe owners may want to use this opportunity to disable the annoying "window convenience" feature. This feature moves the door window slightly when you open/close the door. Operation of this feature is rather crude and was improved in late 1994 cars. It's not necessary for window fit or sealing and can be safely disabled. See step 17 below.
I recommend reviewing the procedure for removing the door lock assembly in the Bentley service manual (sec 515, pg 1-2), as well as the door panel removal procedure (sec 411-3). Door lock wiring diagrams are in ELE 226-227.
Procedure
1) Remove door panel (Bentley 411, pg 3-4). If door panel clip holders come off, glue them back in place and let the panel set-up overnight.
2) Raise window. Remove vapor barrier and set aside (try to keep the black goo off your hands).
3) Remove interior door handle with T-20 torx (Bentley 515-2, fig 2).
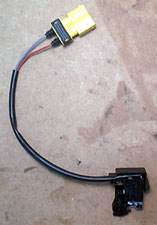
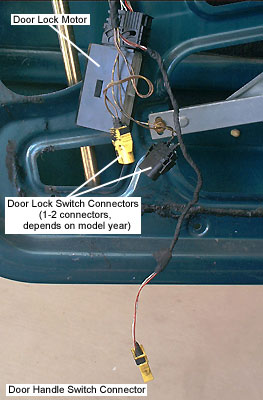
4) Unplug all microswitch connectors inside door by door jamb lock. Depending on model year, these could be either yellow or black, or both. Also unplug the yellow door handle microswitch connector up by exterior door handle (red/white, red/green wires). Unclip wire bundles from holders and clip wire ties.
5) Remove door lock mounting screws with T-30 torx. See image below.

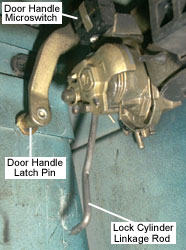
6) Reach inside the door and pull out the lock cylinder linkage rod from the lock unit. Then lift the unit up and off the door handle latch pin. See Bentley sec 515-2, fig 4 for a good illustration. Lock unit should now be free.
7) Carefully maneuver unit down to bring door lock rod outside door, then move entire lock unit outside. Unhook rod for door lock and interior door handle.
8) Disconnect door lock motor from lock unit and move lock unit to work bench. See images below.
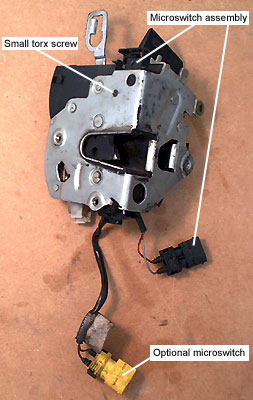
9) Using a T-9 torx, remove small screw from lock assembly. See image above right. If you don't have a T-9, try a T-10 and reduce the tip size by using a wire wheel on a bench grinder (that's what I did!). You just need a small "bite" to loosen that screw.
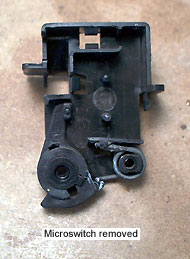
10) Pull out old microswitch. Carefully install new microswitch and secure with screw.
NOTE: Coupes from 92 and early 93 have two door lock microswitches. I've found only one switch is necessary (the one you just replaced). I removed the optional microswitch, or you may leave it disconnected. However, this may depend on your car's lock module software.
Ready to put it back together?
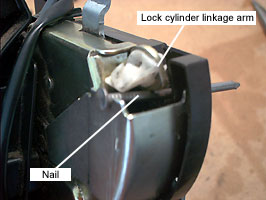
11) To keep the lock cylinder linkage from falling down into the lock unit where it is inaccessible, put a pin through the hole in the lock unit to hold it up while it's installed. I used a nail. See image below left.
12) Install door lock rod and interior handle rod, then plug in yellow door lock and door handle switch connectors. Tie wrap both of these wires to the lock unit, then connect lock motor.
13) Insert door lock rod into door first, then maneuver lock unit inside. Once in, move lock unit down to gain clearance for door lock rod to be inserted back in its opening, then move lock unit into position.
14) Now the hard part: insert lock cylinder linkage rod into its plastic retainer linkage (the one being held up by the pin/nail). Remove pin once secure, then move lock unit up and onto the door handle latch pin. See image above right.
15) Whew. Insert mounting screws finger-tight temporarily and check fit. Secure wiring back inside clips, making sure all wires are routed away from travel of window. Ensure lock motor and microswitch wiring is routed outside of interior door handle rod. Use tie wraps.
16) After you've confirmed lock unit fit and wire routing, tighten mounting bolts and test new microswitch by opening/closing door.
17) Coupe option: Want to disable the "window convenience" feature (explained above)? Now is a good time. Simply simulate a closed door by closing the door jamb lock by hand (window should move up), and unplug the "convenience" connector from the window motor. See image below. Don't forget to re-open "closed" door before shutting. The other door window can be disabled by just removing the door panel.

18) Finish up by re-installing moisture barrier and repaired door panel with un-broken white mounting clips.
TIP: When installing door panel, start at top and work down. Some white clips may not align properly with the holes so use a blade screwdriver or thin tool to move clips into position. This is especially true of the clips along the bottom. Lie on your back under the door to position these clips (you'll need a flashlight to see). Don't bang on the panel (you'll break the clips!). Clips should snap into place when you push on the panel.
Now, pour yourself a beer and reflect on your hard work!